
Barcode Labels – Creating
Applies to:
KeepStock
Inventory Scan
To generate ALL barcode labels for a
program:
1.
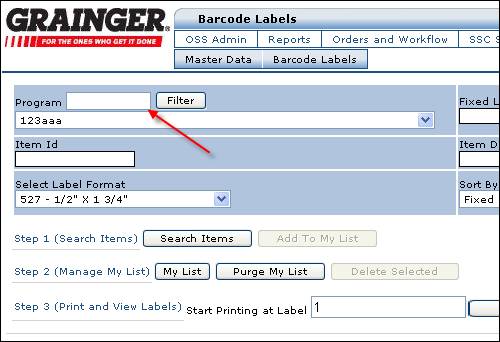
Follow the menu path Item Admin -> Barcode Labels
-> Print
2.
Use the filter field to filter the data in the
program drop down field or leave blank to list all programs in the drop
down. Example: Entering CAR will return
the following results: cardinal
health and McArthur.
4.
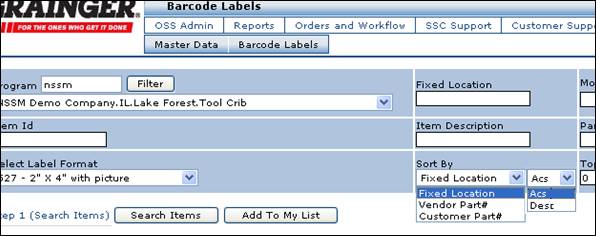
Use the Sort by field to sort by Fixed Location,
Vendor Part # or Customer Part #. Then
select to have these sorted either in Asc (Ascending) or Desc (Descending)
order.
5.
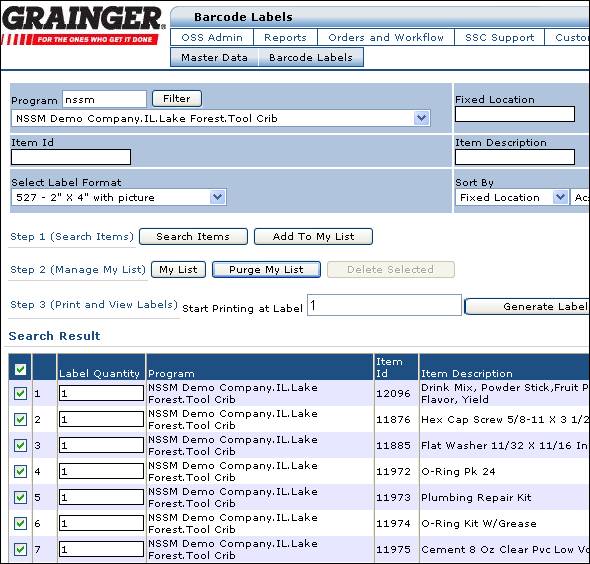
Click the ![]() button to view all items assigned to the
Program
button to view all items assigned to the
Program
6.
(Optional) Enter quantity of labels if more that one
is required in the Label Quantity column.
7.
Click the ![]() button to add all items to your list of labels
to print. Page refreshes and all items are added to “My List”.
button to add all items to your list of labels
to print. Page refreshes and all items are added to “My List”.
8.
To view the items that is in your list click on the
“My List” button. To Purge all your
items in your list click on “Purge My List”
9.
Users have the ability to select where they want to
start printing labels on the label page.
Enter the label position to start printing at. (i.e. Print at label
postion 5)
10. Click the ![]() button
button
Note: Depending on the number of items the Generate
Labels function may take several
seconds.
11. When the label generation is complete, you will see
information that indicates
“xxx Label(s) written on xx Page(s)”
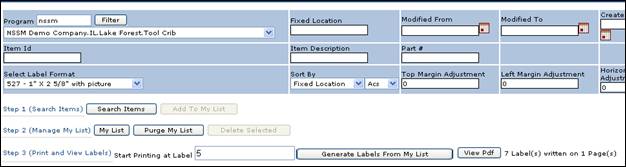
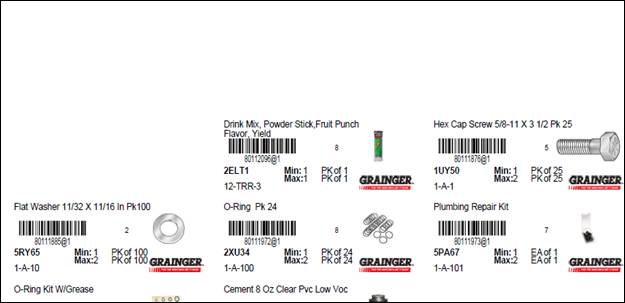
12. Click the ![]() to view the labels in Adobe Acrobat – Please
note that the starting label is in Label position 5 on the label page.
to view the labels in Adobe Acrobat – Please
note that the starting label is in Label position 5 on the label page.
NOTE
– From Adobe Acrobat you will be able to print the labels to label stock or
print them to plain paper to produce a bar code catalog, or you can save the .pdf file to your hard drive to print
later or attach to an email.
To
print the file, please refer to the instructions for “Printing and aligning labels”
To generate SELECTED barcode labels
for a program (create a barcode list)
Create
a list of barcode labels that you want to print. You can create or add to your list by
searching for program items with shared attributes (i.e. all labels modified
last week), or by using the check box next to displayed item(s) to select the
item(s) to print.
To select items with shared attributes
to add to your list:
1.
Follow the menu path Item Admin -> Barcode Labels
-> Print
2.
Use the filter field to filter the data in the
program drop down field or leave blank to list all programs in the drop
down. Example: Entering CAR will return
the following results: cardinal
health and McArthur.
4.
Use the Sort by field to sort by Fixed Location,
Vendor Part # or Customer Part #. Then
select to have these sorted either in Asc (Ascending) or Desc (Descending)
order.
5.
If you want to
select a group of labels that have shared attribute(s), enter search criteria in one attribute field, or a combination of
attribute fields:
|
Field Name/Attribute |
Description |
|
Item Id |
Enter the Item Id (Bar Code
Label ID). The system will locate any
exact match in the program. |
|
Fixed Location |
Enter all or part of the
fixed location(s). I.e. entering 2-B
will find “Unit 2-B-2” and
“Cabinet 3-H-2-B” |
|
Item Description |
Enter any portion of the
Item Description. I.e. entering “mot”
will find “Motors”, but
will also find “Grease, automotive” |
|
Part # |
Enter all or part of the
Vendor Part #. I.e. entering 2C will
find all Part #’s starting with the characters “2C” |
|
Modified From: |
Enter the Modified From date
in MM/DD/YYYY format or use the calendar icon |
|
Modified To: |
Enter the Modified To date
in MM/DD/YYY format, or use the calendar icon Note: If you leave Modified To date blank the
program will select all records created or modified on the Modified From date
to current date. |
|
Created From: |
Enter the Created From date
in MM/DD/YYYY format or use the calendar icon |
|
Created To: |
Enter the Created To date
in MM/DD/YYY format, or use the calendar icon Note: If you leave Created To date blank the
program will select all records created on the Created From date to current
date. |
6.
Click ![]() to view the results of your search..
to view the results of your search..
7.
Click ![]() to add the item to the list of labels to be
printed
to add the item to the list of labels to be
printed
NOTE: To modify the search, modify, delete or enter
additional attributes and click on the ![]() button again to display the new results.
button again to display the new results.
To select specific items to add to your
list:
1.
Display the results of a search for program items.
2.
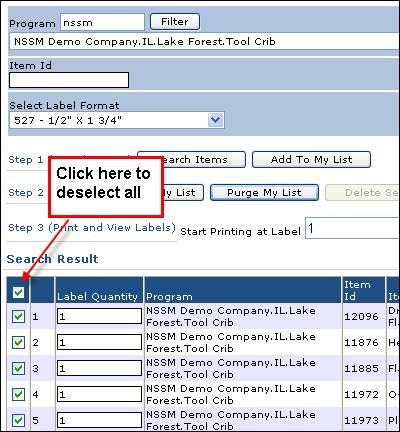
Click on the “Select/Deselect” Icon
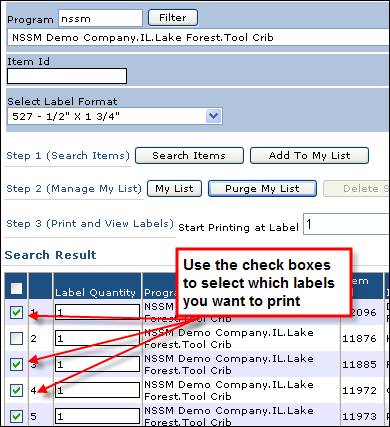
3.
Click on the check box next to the items you want to
print.
4.
Click the ![]() button to add the selected items to your list.
button to add the selected items to your list.
1.
Click the ![]() to view the items you have selected
to view the items you have selected
2.
Use the checkbox in the upper left hand corner of my
list to select all items in My List
3.
Click the ![]() button to remove all items.
button to remove all items.
To remove selected items from your
list:
1.
Click the ![]() to view the items you have selected
to view the items you have selected
2.
Use the checkbox in the upper left hand corner of my
list to deselect all items in My List, then select specific items you wish to
remove from you list by checking the box to the left of that line item.
3.
Click the ![]() button to remove selected items.
button to remove selected items.
To view your list and generate labels
for items on your list:
1.
Click the ![]() to view the items you have selected
to view the items you have selected
2.
Click the ![]() button
button
3.
Note:
Depending on the number of items the Generate Labels function may take several seconds.
4.
When the label generation is complete, you will see
information that indicates
“xxx Label(s) written on xx Page(s)”
5.
Click the ![]() to view the labels in Adobe Acrobat
to view the labels in Adobe Acrobat
-
Click the
 to view the labels in Adobe® Reader®.
NOTE: From Adobe® Reader® you will be able to print the labels to label stock or print them to plain paper to produce a bar code catalog, or you can save the .pdf file to your hard drive to print later or attach to an email.
To print the file, please refer to the instructions for Printing and Aligning labels.