Create Adjustment Transaction
Applies to:
KeepStock
Inventory Scan
- Function to be used when adjusting inventory quantities to receive product for Inventory Management customers.
Scanner Overview
There are three ways to navigate and operate the scanner:
- Use the stylus to tap buttons and fields on the scanner screen.
- Use the hard keyboard to enter information and the ENT key to save values. Use the Arrow buttons on the keyboard to highlight fields and the ENT key to select the field.
- For some functions there are “hot” keys, for example:
- Press “S” – to Scan Items
- Press “V” – to View Items
- Press “U” – to Upload Items
- Press “A” – for About (about the application, and application version)
- Press “X” – to Exit
To Scan Items:
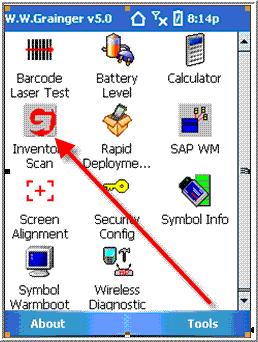
- Select the “Inventory Scan” icon on the screen
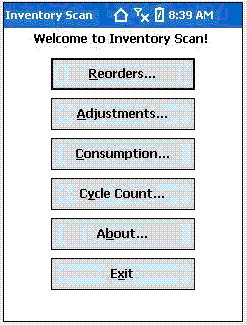
- Select Adjustment using the stylus, arrow keys or by keying in the letter “A”
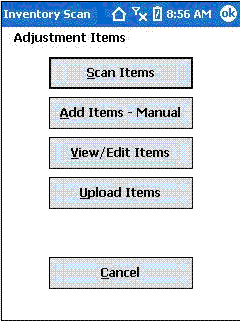
- From the following screen select using the stylus, arrow keys or by keying in the underlined letter:
| Select: | To: |
|---|---|
| Scan Item | Scan items barcodes for adjustment. |
| Add Items - Manual | Manually add items being adjusted |
| View / Edit Items | View / Edit items that have been scanned or manually added for adjustment |
| Upload Items | Upload adjusted items to the Inventory Solutions application |
| Cancel | Go back to the previous screen |
Scan Item
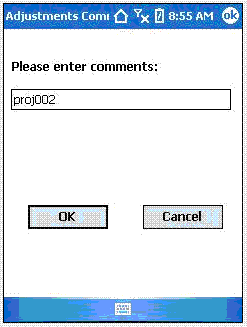
- After selecting Scan Items you will be prompted to enter comments, which will be added to the adjustment transaction lines
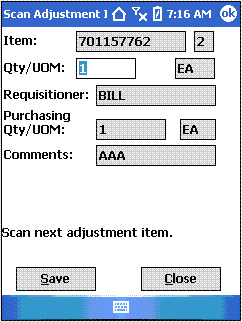
- Scan the bar code label for the item. Item, Qty, Requisitioner, Purchasing Qty/UOM, and Comments will populate for the adjusted item. Once scanned, the user has the option to either scanning the next adjustment item, or changing the adjustment quantity and clicking
-
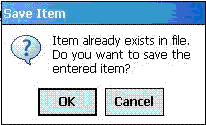
NOTE – You cannot scan the same Barcode ID twice. You will see this error if the barcode ID was previously scanned and not yet uploaded:
- Select OK to save the entered Item. Select Cancel to remove the item from the scanned item.
- b. If you select OK, a quantity of 1 will automatically be added to the total adjustment quantity. This new quantity will be displayed on the Scan Adjustment screen. If the quantity is updated to a new quantity after this point, the total adjustment quantity will be updated by clicking

![]()
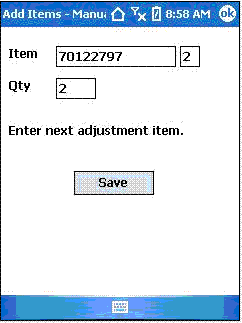
Enter an item manually for adjustment
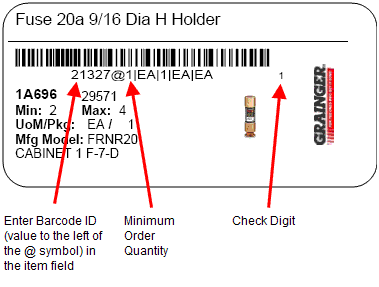
Use information on the bar code label to manually enter the item number, check digit and quantity on the scanner.
- After selecting Scan Items you will be prompted to enter comments, which will be added to the adjustment transaction lines
- Enter Barcode ID in the Item field
- Enter the Check digit in the Check digit field by moving the courser with the Down arrow or select the field with the stylus
- Enter order quantity
- Save
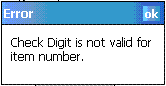
NOTE: The check digit is designed to prevent you from entering an item which does not belong to your Program (stocking area). If you receive the following error, please verify the barcode ID and check digit that you are trying to enter:
IMPORTANT NOTE: Always EXIT the Inventory Scan application when it is not in use. The items you have scanned are not saved to the application until you Exit.
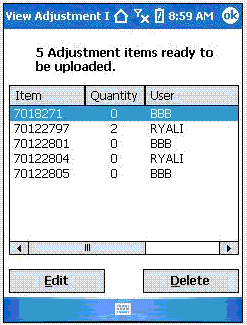
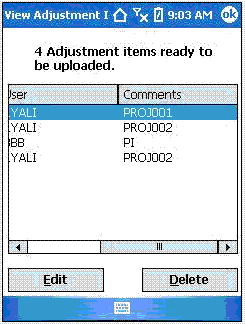
View or Edit Adjustment Items
From the View or Edit Adjustment Items screen you can view all items entered and ready for uploading or select an item using the stylus or place the cursor on the item you would like to edit. After highlighting the item select Edit to edit the item quantity or Delete the item from the Adjustment list.
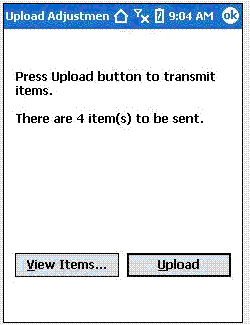
Upload Items
When the scanner is docked in the cradle and you wish to upload the Adjustment items select Upload Items from the menu then follow the on-screen directions. If you wish to view the items prior to uploading you can select View Items