
Troubleshooting Guide
Applies to:
KeepStock
Inventory Scan
Scanner Application Installation Issues
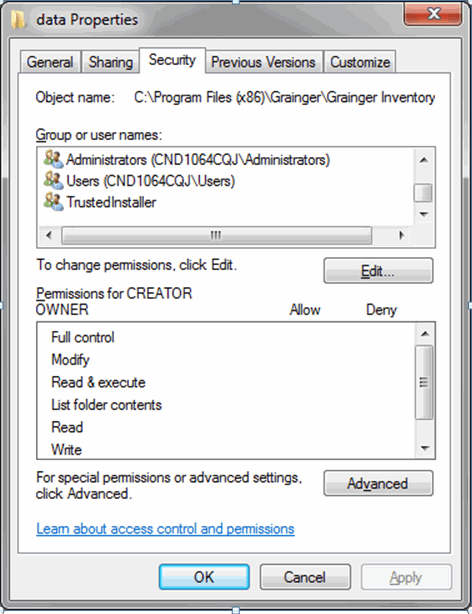
![]() The ‘Granger Inventory Scan application’ installation and scanner driver configuration need admin rights on the PC. Make sure you have admin rights on the machine and write permissions to C:\Program Files\Grainger folder.
The ‘Granger Inventory Scan application’ installation and scanner driver configuration need admin rights on the PC. Make sure you have admin rights on the machine and write permissions to C:\Program Files\Grainger folder.
![]() If any Firewall or Security alert process (e.g. ZoneAlarm) running on the machine blocks or deny access to run the install process, Make sure you allow or grant permission to run the installation process.
If any Firewall or Security alert process (e.g. ZoneAlarm) running on the machine blocks or deny access to run the install process, Make sure you allow or grant permission to run the installation process.
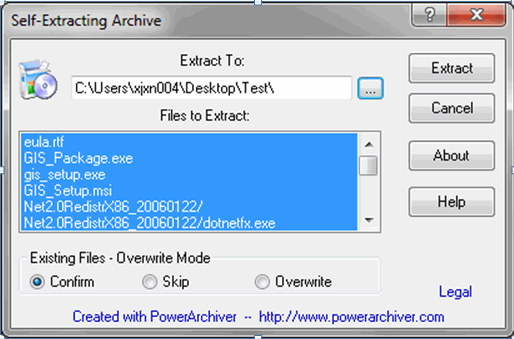
![]() If the machine has no or lower version of Microsoft .NET 2.0 framework, the installation process prompts and tries to install the .NET 2.0 as the part of the process. Click ‘Accept’ to continue the installation.
If the machine has no or lower version of Microsoft .NET 2.0 framework, the installation process prompts and tries to install the .NET 2.0 as the part of the process. Click ‘Accept’ to continue the installation.

![]() If the machine is shared by multiple user with multiple log-ins, make sure you have selected ‘Everyone’ option during the installation process as shown below. The application is accessible for only the user who installed it incase he has selected ‘Just me’.
If the machine is shared by multiple user with multiple log-ins, make sure you have selected ‘Everyone’ option during the installation process as shown below. The application is accessible for only the user who installed it incase he has selected ‘Just me’.

![]() If the installation hangs or files get corrupt, stop or kill the installation process. Go to Add or Remove programs (Start > Setting > Control Panel) and remove ‘Grainger Inventory Scan’ and start the installation process from the beginning
If the installation hangs or files get corrupt, stop or kill the installation process. Go to Add or Remove programs (Start > Setting > Control Panel) and remove ‘Grainger Inventory Scan’ and start the installation process from the beginning
![]() If Granger Inventory Scan application is not available as desktop icon or at Start > Programs. Go to Add or Remove programs (Start > Setting > ControlPanel) and remove ‘Grainger Inventory Scan’ application and install the application again from the beginning.
If Granger Inventory Scan application is not available as desktop icon or at Start > Programs. Go to Add or Remove programs (Start > Setting > ControlPanel) and remove ‘Grainger Inventory Scan’ application and install the application again from the beginning.
![]() If any of the above steps doesn’t resolve the issue, please contact customer care at
If any of the above steps doesn’t resolve the issue, please contact customer care at
Scanner Issues
| Problem | Possible Cause | Possible Solution |
|---|---|---|
| The scanner is not working. | Batteries are loaded incorrectly. | Reload batteries. Make sure the (+) and (-) signs on the batteries line up with the signs inside of the battery cover. |
| Batteries are dead. | Insert new batteries. | |
| Hardware failure. | Call Symbol Technical Support. See Service Information. | |
| The scanner is not scanning or deleting items. | The bar code may be damaged. | Try a different bar code. |
| You are too far from or too close to the bar code. | Move the scanner closer to or farther from the bar code. | |
| You are scanning at an incorrect angle. | Change the angle until the scanner reads the bar code. | |
| You are scanning an unsupported or disabled bar code type or that bar code type may be disabled in the software. | Try a different bar code. Make sure the correct bar code support is enabled. | |
| The scanner is connected to the PC and communication has been established. | Scanner will not scan when the communication cable is connected to the scanner and a host communications session has been started. Disconnect the cable and try again. | |
| Memory is full. | This situation is indicated by the red indicator steadily lit and the scanner emitting a series of continuous long beeps. Upload the scanner data to your application or press and hold the Delete Button for 6 seconds to clear the scanner's memory. Caution: all data will be lost by performing this function. | |
| Stored bar code information is not transferring to the PC. | The communication cable is not connected properly. | Check that the cable is properly connected to the scanner and the PC. |
| The communication software is not properly loaded or is corrupt. | Check that the communication software is loaded properly on your PC. Consult your software application guide. If necessary, reload the communication software on the PC. | |
| The PC serial port is not properly configured. | Consult your hardware and operating system user documentation. | |
| LED indicator blinks red. | Low battery. | Replace batteries. |
| LED indicator flashes red, green and amber. | Hardware failure. | Contact customer care to replace the scanner. |
![]() If any of the above steps doesn’t resolve the issue, please contact customer care at
If any of the above steps doesn’t resolve the issue, please contact customer care at
Granger Inventory Scan Application Issues
Check Point 1 – Unable to connect to scanner
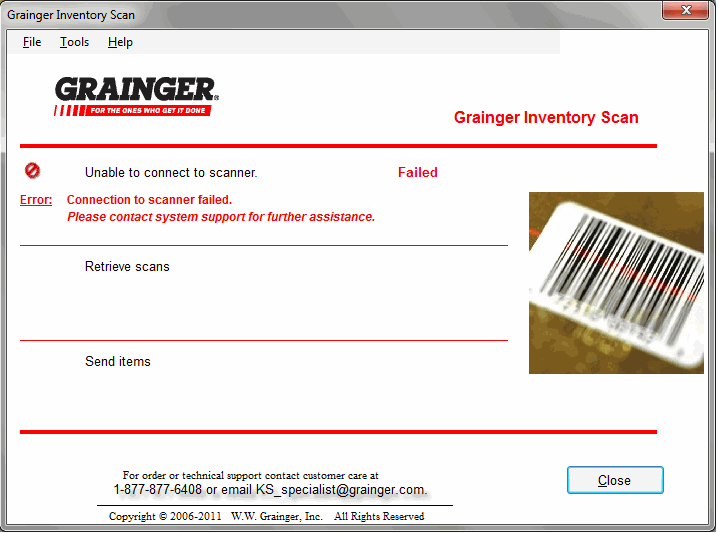
![]() Check if the following connections are properly connected:
Check if the following connections are properly connected:
- Scanner - Serial Cable
- Serial Cable – USB-to-Serial Converter
- USB-to-Serial Converter - PC

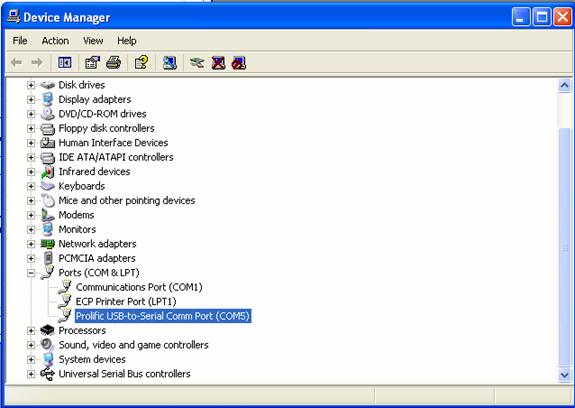
![]() Check if the drivers are loaded and installed properly. To verify, go to Start > Settings > Control Panel (Windows XP or older) and click ‘System’ which opens up System Properties window. Select ‘Hardware’ tab and click ‘Device Manager’. Use Device Manager fro Win 7 & 8. Verify if ‘ Prolific USB-to-Serial Comm Port (COM5)’ appears in the list of Ports (COM & LPT)
Check if the drivers are loaded and installed properly. To verify, go to Start > Settings > Control Panel (Windows XP or older) and click ‘System’ which opens up System Properties window. Select ‘Hardware’ tab and click ‘Device Manager’. Use Device Manager fro Win 7 & 8. Verify if ‘ Prolific USB-to-Serial Comm Port (COM5)’ appears in the list of Ports (COM & LPT)
![]() Verify if the installation process has successfully installed the drivers in C:\Program Files\Grainger\Inventory Scan folder.
Verify if the installation process has successfully installed the drivers in C:\Program Files\Grainger\Inventory Scan folder.
![]() If any of the above steps doesn’t resolve the issue, please contact customer care at
If any of the above steps doesn’t resolve the issue, please contact customer care at
Check Point 2 – ‘0 scan(s) retrieved’

![]() Check to make sure that the barcode label is valid with right format. Check if the scanner is able to recognize the barcode label and make sure the scanner beeps with the solid green light during the scan.
Check to make sure that the barcode label is valid with right format. Check if the scanner is able to recognize the barcode label and make sure the scanner beeps with the solid green light during the scan.
![]() Check if the scanner battery is low. Check if the scanner has stored the scans in its memory with a beep while scanning.
Check if the scanner battery is low. Check if the scanner has stored the scans in its memory with a beep while scanning.
– ‘Unable to retrieve scans.’

![]() Check to make sure if all the cable and USB connections are properly connected. As the scanned items are saved both in scanner’s memory and on the local machine, the scans will be retrieved successfully on the next attempt. To resolve the issue, close the existing window and re-try by starting the application.
Check to make sure if all the cable and USB connections are properly connected. As the scanned items are saved both in scanner’s memory and on the local machine, the scans will be retrieved successfully on the next attempt. To resolve the issue, close the existing window and re-try by starting the application.
![]() If any of the above steps doesn’t resolve the issue, please contact customer care at
If any of the above steps doesn’t resolve the issue, please contact customer care at
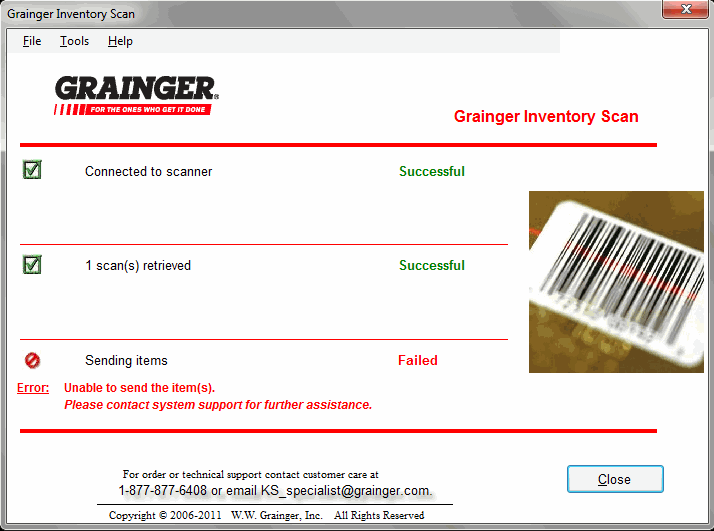
Check Point 3 – Sending items Failure
![]() Check if ‘Granger Inventory Solutions’ application is available. To Verify, go to https://inventory.grainger.com/prod01/Login.aspx and try to login and see if can get into the application.
Check if ‘Granger Inventory Solutions’ application is available. To Verify, go to https://inventory.grainger.com/prod01/Login.aspx and try to login and see if can get into the application.
![]() If the application is available and running, re-try sending the items by closing the existing Grainger Inventory Scan application window and launching it again.
If the application is available and running, re-try sending the items by closing the existing Grainger Inventory Scan application window and launching it again.
![]() If there are 0 scans retrieved, step3 would show ‘Failed’ status and an error message as ‘Error: Unable to send the item(s)’ since there aren’t any items to be sent to the application.
If there are 0 scans retrieved, step3 would show ‘Failed’ status and an error message as ‘Error: Unable to send the item(s)’ since there aren’t any items to be sent to the application.
![]() Check to make sure if all the cable and USB connections are properly connected.
Check to make sure if all the cable and USB connections are properly connected.
![]() Check to make sure that there are no firewall or proxy servers setting setup on your machine or network.
Check to make sure that there are no firewall or proxy servers setting setup on your machine or network.
![]() Check to make sure that you have write permissions to C:\Program Files\Grainger folder. Need the correct user rights and if dont have admin rights you need to have someone with admin rights set up the user rights.
Check to make sure that you have write permissions to C:\Program Files\Grainger folder. Need the correct user rights and if dont have admin rights you need to have someone with admin rights set up the user rights.
![]() If any of the above steps doesn’t resolve the issue, please contact customer care at
If any of the above steps doesn’t resolve the issue, please contact customer care at
‘Granger Inventory Scan’ application Startup Issues
If the user is being asked to reinstall the application (and presented with the message below) after rebooting their system, and attempting to launch the Grainger Inventory Scan application, the cause is a missing key in the system’s registry.
![]() Have the admin user uninstall the previous application by going into the Control Panel, then double-clicking the Add/Remove Programs icon:
Have the admin user uninstall the previous application by going into the Control Panel, then double-clicking the Add/Remove Programs icon:

![]() Find the Grainger Inventory Solutions application in the list and highlight it:
Find the Grainger Inventory Solutions application in the list and highlight it:

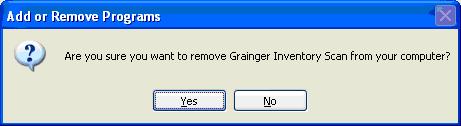
![]() Click the Remove button to uninstall the software.Click ‘Yes’ on the confirmation dialog window:
Click the Remove button to uninstall the software.Click ‘Yes’ on the confirmation dialog window:
It will then remove the program from the PC.

![]() The Admin user should download the software from the Inventory Solution's web site
The Admin user should download the software from the Inventory Solution's web site
![]() Extract the contents from the download link to the desktop folder.
Extract the contents from the download link to the desktop folder.

![]() Once the application is installed, the Admin user should log off and allow the sub-users to log in. Each sub-user should see an installation dialog after they have logged in showing the application being installed:
Once the application is installed, the Admin user should log off and allow the sub-users to log in. Each sub-user should see an installation dialog after they have logged in showing the application being installed:
![]() After this installation dialog closes, the application should be installed for this user. Once the software is installed for all sub-users, the Admin user should be able to delete the installation folder from the hard drive.
After this installation dialog closes, the application should be installed for this user. Once the software is installed for all sub-users, the Admin user should be able to delete the installation folder from the hard drive.
‘Granger Inventory Scan’ - Upload Issues
It’s common to be able to access the Grainger Inventory Solutions website from a browser (https://inventory.grainger.com), and yet unable to upload data to the application successfully. In many cases, changing the proxy settings to allow traffic from/to this host name may not be enough. Allowing port 443 and/or https protocol alone may not be sufficient either. The user may need to allow 'All Outbound Protocol' to https://inventory.grainger.com to resolve the problem.
‘Granger Inventory Scan’ - Proxy Server Issues

To configure the Proxy Server
For the users who have internal proxy setup, Please follow the following steps to configure the proxy server settings.- Once the installation is complete.
- Right click on ‘G’ icon in the system tray and select ‘Retrieve and send scans’
- Go to Tools > Options from the Inventory Scan application window
- Check ‘Internet Connection established via Proxy Server’ check box
- Enter your proxy server name in ‘Server DNS Name’ text box
- Enter your port number in ‘Port” text box
- Leave the default ‘Allow Redirect’ check box settings as unchecked.
- Check Proxy Authentication Required checkbox.
- Enter proxy username in ‘User Name’ text box
- Enter proxy Password in ‘Password’ text box