Create Spot-Buy Orders
Create a New Order
Accessing an
Existing Order
Adding Items
Loaded in the Program to an Order
Adding a Spot-Buy Item to an
Order
Any printed copies of this document are not controlled and will not
be updated. Printed copies are
considered for reference and/or for training purposed only.
There are two ways to add items to an order:
1.
Create a new order on the website
2.
Add on to an existing order
These items can either be items already loaded in the
customer’s program or can be added as a Spot Buy.
The Two Ways to Access an Order
1. Create a New Order:
Users can
create new orders from the Inventory Solutions application without having to
scan the item(s) barcodes. Order can be created for items that may or may not be
part of the user’s program. The user creating the order must have the adequate
role assigned to access this function. To create a new Spot-Buy order, follow
the next step:
- Click on the
 tab
from the Order Summary page.
tab
from the Order Summary page.
- Click on the
 menu.
menu.
- The ‘Create New Order’ page
should be displayed.
- Use the filter field to filter the data in the
program drop down field or leave blank to list all programs in the drop
down. Example: Entering CAR will
return the following results: cardinal
and McArthur. Select program from drop down list.
Page1. Process drop-down
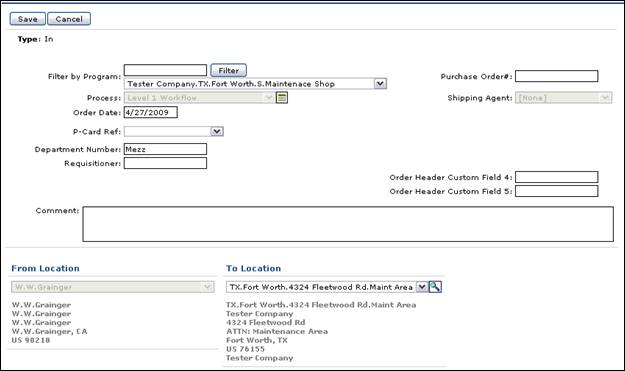
- After all fields are set, the
user selects the ‘Save’ button
and they are directed to the ‘Order Lines’ page.

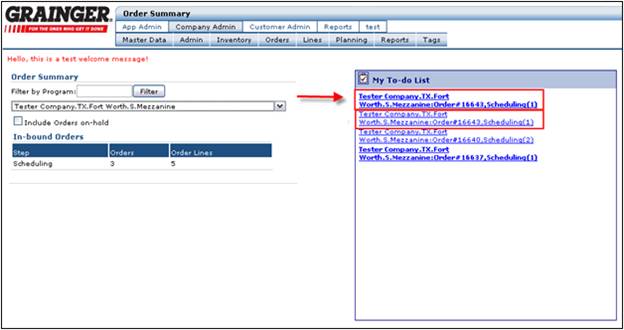
2. Accessing an
Existing Order:
Users can
add items that may or may not be part of their program to an existing order. The
user executing this process must have access to an ‘Open’ order via the To-Do list, or the Scheduling, and/or
Acknowledgement transactions depending on the level of workflow the program is
setup with. To add an item to an existing order, follow the next set of steps:
- View the ‘Open’ order from the To-Do list by clicking on the order
hyperlink from the list of pending transactions
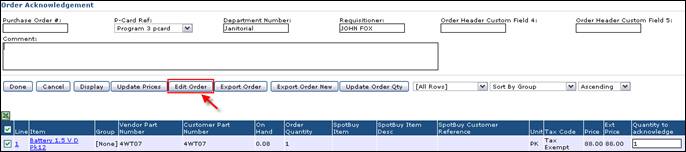
- Click on the ‘Edit Order’ button from any of the
workflow pages (Schedule or Acknowledge). The user will be directed to the
‘Order Lines’ page.
Adding Items to an Order
Adding Items Loaded in
the Program to an Order
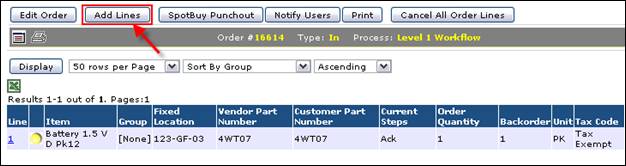
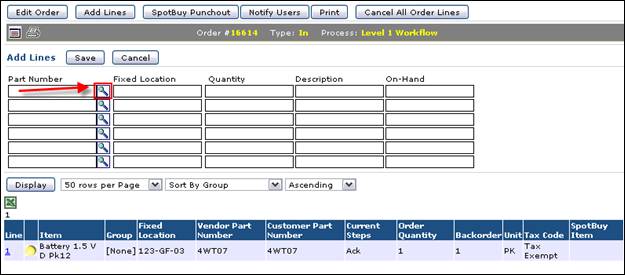
- Once the ‘Order Lines’ page is
displayed, click on the ‘Add Lines’
button to add additional place holder lines to your order
- The item that needs to be added
to the order already exists in the program. Search for the item in the
program by clicking on the search icon.
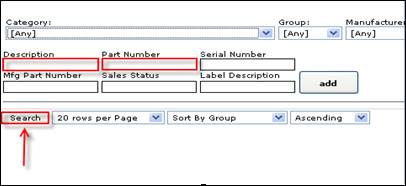
- Search for the item by using the
key search attributes in the Item Search pop-up. Click on the ‘Search’
button once the search attribute fields have been populated.
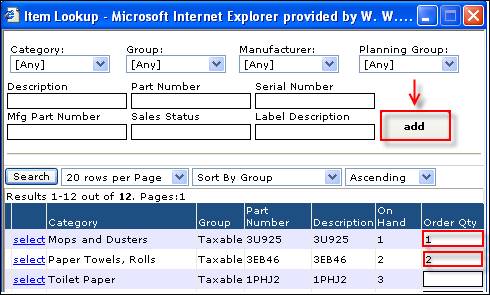
- The user can select any item or
set of items from the search results to be added to the order. To do this,
simply fill in the ‘Order Quantity’ field with the desired order quantity,
and then click the ‘add’ button.
- The popup will display a status
message indicating the number of items added to the order
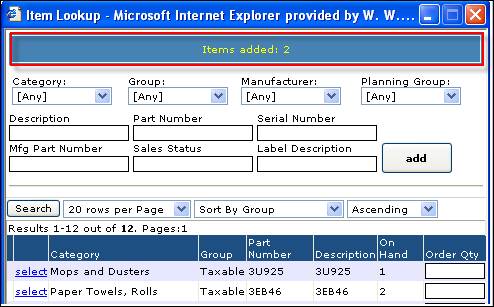
- The user can validate that the
items were added to the order by reviewing the items in the Order Lines page
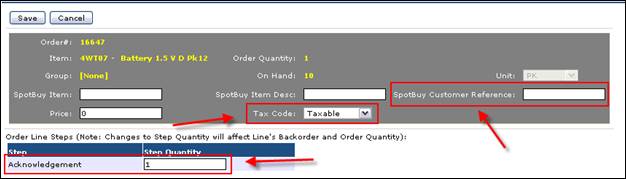
- To edit the line level detail,
click the numbered line link of the item that needs to be edited. This directs the user to the ‘Edit
Line’ page.
- On the ‘Edit line’ page, the
user can edit quantity and customer reference number. Customers that have been set up to
be able to edit their tax can also edit the tax status of the line on this
page.
Adding a Spot-Buy Item to an Order:
1.
Click on the ‘Spot-Buy Punchout’ button if the item was not found in the program
item list.

2.
This logs the user into Grainger
eProcurement. Here the user has the
following options:
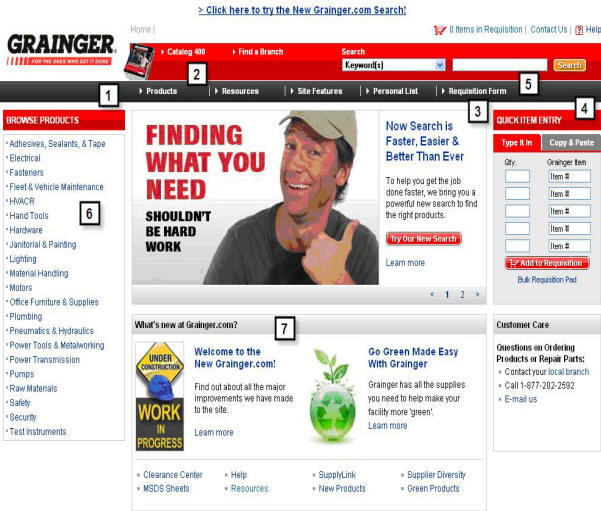
1.
Navigation Bar -
This navigation bar appears on every page of this site.
2.
Online Catalog -
Easily flip through catalog pages, search Product
Index and make purchases in just a few clicks.
3.
Quick Item Entry -
Use this Quick Order Entry Pad to purchase products directly from the home page. For
larger orders, use our Bulk Requisition Pad.
4.
Copy & Paste -
Copy lists of items from a purchasing system, spreadsheet, e-mail or word processing
document and paste them into the Copy & Paste tool section to add them to your requisition. All
you need is a list with quantities and Grainger Item #s to use the
Copy and Paste functions found in the Edit
menu of most computer programs.
5.
Search - Select from
Product
Index entries just like in the printed catalog. Select from a list of all the Manufacturer/Brand names
Grainger carries, or search by Product Category. You can also search by Keyword(s),
Grainger Item number, Manufacturer/ Brand, Manufacturer Model number, National
Stock Number (NSN),
Cross-Reference number or Supplier Diversity Products.
6.
Browse Products -
Click on any category to browse the more than 155,000 products in our catalog online. You can
keep refining your search until you find what you’re looking for.
7.
Get More Info -
Check in often for useful information, news and special offers that matter to you. This section
includes helpful links to features like product information, select manufacturers,
specialty catalogs and more.
Note: For more information on the
eProcurement site, check out their user guide at:
https://www.gconnection.com/ecom/epro/eproindex.asp
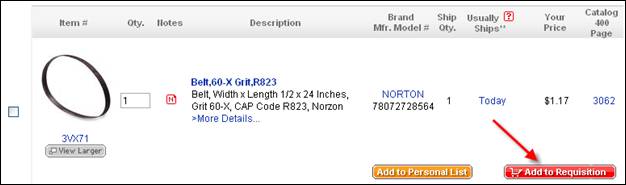
3.
To add an item to your requisition,
simply click the  button
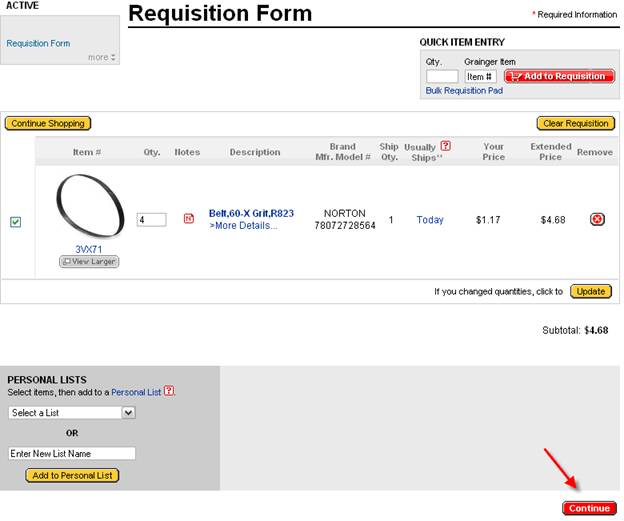
4.
After the user selects their last
item, they go to their requisition form.
5.
From the requisition from, the user
can make any necessary changes and then click  .
.
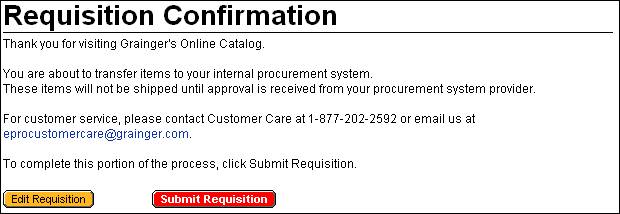
6.
The user is then asked to confirm
their requisition. By clicking on  the
user will be returned to the Inventory Solutions website.
the
user will be returned to the Inventory Solutions website.
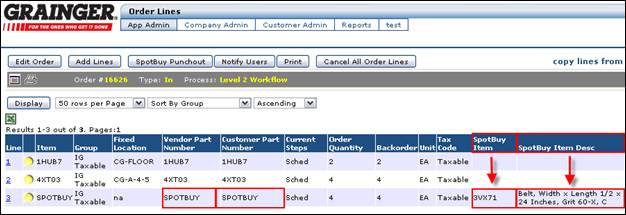
7.
Spot-Buy items added to an order have
unique attributes in the Order Lines page:
- The ‘Item’ and ‘Description’
fields will have the token name ‘SPOTBUY’
- There is a column on this page
‘Spot Buy Item’ that displays the part number entered by the end-user.
- There is a column on this page
‘Spot Buy Item Desc’ that displays the item description entered by then
end-user. This field in limited to 50 characters.
8.
To edit the line level detail, click
the numbered line link of the item that needs to be edited. This directs the user to the ‘Edit Line’
page.
9.
On the ‘Edit line page, the user can
edit quantity and customer reference number.
Customers that have been set up to be able to edit their tax can also
edit the tax status of the line on this page.
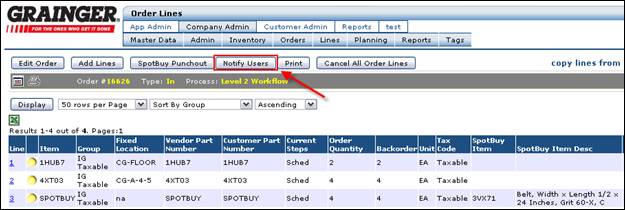
10. Once the order is complete, the user
clicks the ‘Notify Users’
button. This will complete the order
and send a notification for approval.
The user will be taken to the Order Summary page.
If the user has tasks to complete for their order, they will appear in
the To-do List on this page.
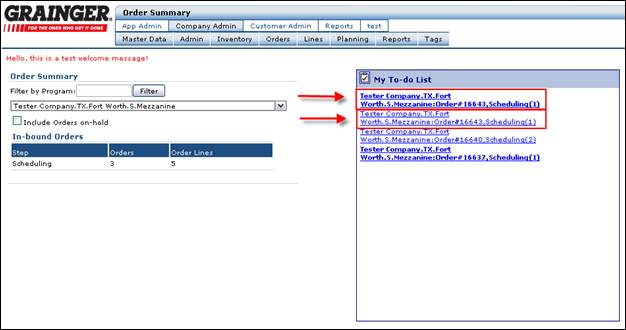
11. The requisition can be reviewed for
Scheduling or Acknowledgement by either clicking on the link in the email or by
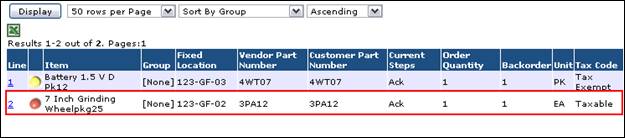
going to the Order Summary page and viewing the To-Do list. The To-Do list will
display two pending transactions with the same ‘Order Number’. One of the pending transactions is associated with
the original sales order lines, and the second one is associated with the
Spot-Buy items. The user can click on either of the two transactions to view the
consolidated order from workflow.
To-Do List View
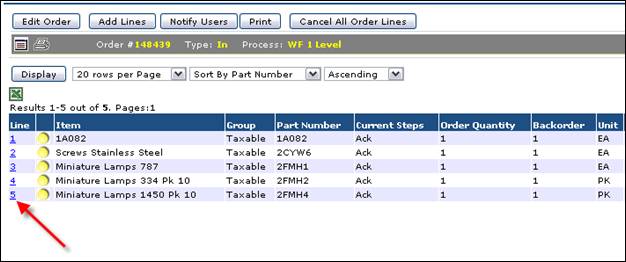
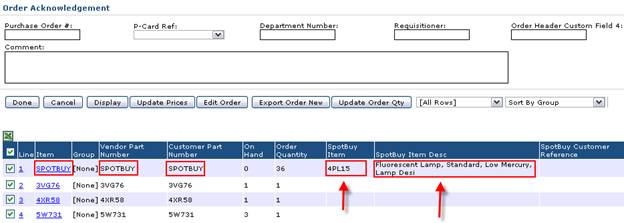
12. Spot-Buy items added to an order have
unique attributes in the Scheduling or Acknowledgement page:
- The ‘Item’ and ‘Description’
fields will have the token name ‘SPOTBUY’. This attribute will not be
hyperlinked.
- There is a new column on this
page ‘Spot Buy Item’ that displays the part number entered by the end-user.
- There is a new column on this
page ‘Spot Buy Item Desc’ that displays the item description entered by then
end-user. This field in limited to 50 characters.
13. The order can be Scheduled or
Acknowledge from workflow by clicking the
‘Done’
button.
